In a call center environment, it is useful for supervisors to have tools for real-time monitoring and management of agent calls. Spy, Whisper, and Barge are three advanced features that allow call monitoring and control:
- Spy: Allows a supervisor to listen to an ongoing call without the participants knowing.
- Whisper: Allows a supervisor to listen to and communicate only with the agent in a call, without the customer hearing the supervisor.
- Barge: Allows a supervisor to actively intervene in a call, turning the conversation into a conference call between the supervisor, the agent, and the customer.
For security and privacy reasons, the Spy, Whisper, and Barge functions are disabled by default in CPBX5. These features can allow unauthorized interception of calls, which could violate privacy policies and legal regulations if not managed appropriately. They should only be enabled and assigned to trusted users with corresponding responsibilities and permissions.
How to Enable Spy, Whisper, and Barge
In the main menu, go to PBX > Applications > Feature Codes.
- Enable the Feature Codes
- *54: Barge into Call
- *55: Spy on Extension
- *56: Spy on Extension in Whisper Mode

2. Save and apply the changes.
How to Assign Spy, Whisper, and Barge Features to a Class of Service
To ensure that the Spy, Whisper, and Barge features are available to specific extensions, you need to assign them to a Class of Service (CoS).
To effectively manage feature access and ensure proper security, you can create two separate Classes of Service (CoS):
- Supervisor CoS: This CoS has all features, including Spy, Whisper, and Barge. It is intended for supervisors who require access to these advanced features for monitoring and management purposes.
- Standard User CoS: This CoS can include all features except Spy, Whisper, and Barge. It is designed for regular users who do not need these advanced call center functionalities.
This step-by-step guide will show you how to do it:
- Create a Feature Category for supervisor
- Navigate to the Feature Categories Module:
- Go to PBX > Class of Service > Feature Categories in the main menu.
- Configure the GENERAL Tab:
- Description: Enter a unique title to identify this feature category, such as “Call Center Features”
- Manage Enabled Features:
- In the Available Features section, locate the Call Center features:
- Barge into Call
- Spy on Extension
- Spy on Extension in Whisper Mode
- Pause Queue Agent (Toggle)
- Queue Login/Logout
- Pause Queue (Toggle)
- Add individually: Click the + button next to each of these feature codes to include them in this feature category. You can also include additional features as needed.
- Click the Save button to save your configuration.
- In the Available Features section, locate the Call Center features:

2. Create a Feature Category for all users
- Navigate to the Feature Categories Module:
- Go to PBX > Class of Service > Feature Categories in the main menu.
- Configure the GENERAL Tab:
- Description: Enter a unique title to identify this feature category, such as “All Users Features”
- Manage Enabled Features:
- In the Available Features section, select the feature codes you want to include in this category.
- You can add feature codes in two ways:
- Add individually: Click the + button next to each feature code you want to add.
- Add all: Use the “Add all” button to add all available feature codes at once.
- To remove feature codes from the Enabled Features section:
- Remove individually: Click the x button next to each enabled feature code you want to remove. Ensure that you specifically remove the following features from the Enabled Features list:
- Barge into Call
- Spy on Extension
- Spy on Extension in Whisper Mode

3. Create the Class of Service (CoS)
- Navigate to the Class of Service Module:
- Go to PBX > Class of Service > Class of Service in the main menu.
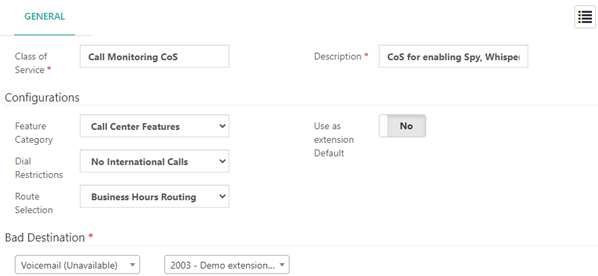
- Configure the GENERAL Tab:
- Class of Service: Enter a unique name, such as “Call Monitoring CoS.”
- Description: Provide a description, like “CoS for enabling Spy, Whisper, and Barge features.”
- Setup the Configurations Section:
- Feature Category: Select the “Call Monitoring Features” category created earlier.
- Dial Restrictions: Choose the restriction rule you created, if applicable.
- Route Selection: Select the route selection you configured, if necessary.
- Configure the Bad Destination Section:
- Bad Destination: Assign a destination for unroutable calls, such as voicemail.
- Click the Save button to finalize the Class of Service.

4. Assign the CoS to Extensions
After creating the CoS, you must assign it to the extensions that will use the Spy, Whisper, and Barge features.
- Go to PBX > Extensions > Extensions, select the desired extension, and assign the “Call Monitoring CoS” in the Class of Service

5. Using the Features:
- To use these features, dial the corresponding feature code from an extension with the appropriate CoS and follow the instructions:
- *54: Barge into Call
- *55: Spy on Extension
- *56: Spy on Extension in Whisper Mode
How to disable spy on some extensions
In certain scenarios, you might need to restrict the ability to spy on specific extensions for privacy or security reasons. This ensures that sensitive or confidential conversations are not inadvertently monitored by unauthorized users. Disabling the spy feature on specific extensions helps maintain confidentiality and control over which extensions are subject to monitoring.
To disable the spy feature on specific extensions, follow these steps:
- Navigate to the Extensions Module:
- Go to PBX > Extensions > Extensions in the main menu.
- Select the Extension:
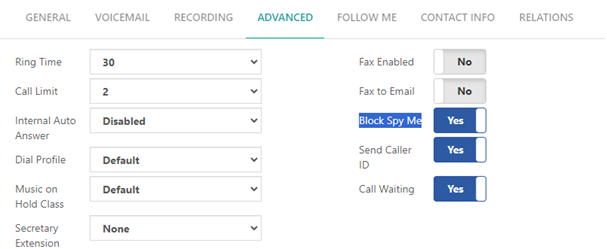
- Click on the list icon and select the extension you want to modify.
- Configure the Extension Settings:
- Click on the ADVANCED
- Enable the Block Spy Option:
- Find the Block Spy Me option and enable it.

6. Save the Configuration:
- Click the Save button to apply the changes.
By enabling the Block Spy Me option, the selected extension is protected from being monitored by other users through the spy feature. If someone attempts to spy on the extension, the system will prompt them to enter the extension password. Without the correct password, the monitoring attempt will be blocked, ensuring that the extension’s calls remain private.
Testing the Configuration:
1. Initiate a Spy Feature Test:
- Dial the feature code for spying on an extension: *55. The system prompts, “Enter the extension number to be monitored.”
2. Enter the Extension Number:
- Enter the extension number of the extension you wish to monitor.
3. Observe the Response:
- If the extension has the Block Spy Me option enabled, instead of proceeding with monitoring, the system will respond with “Please enter the extension password.”
